This general guide will provide you with the basic steps to configure your phone for use with Control Networks' VoIP system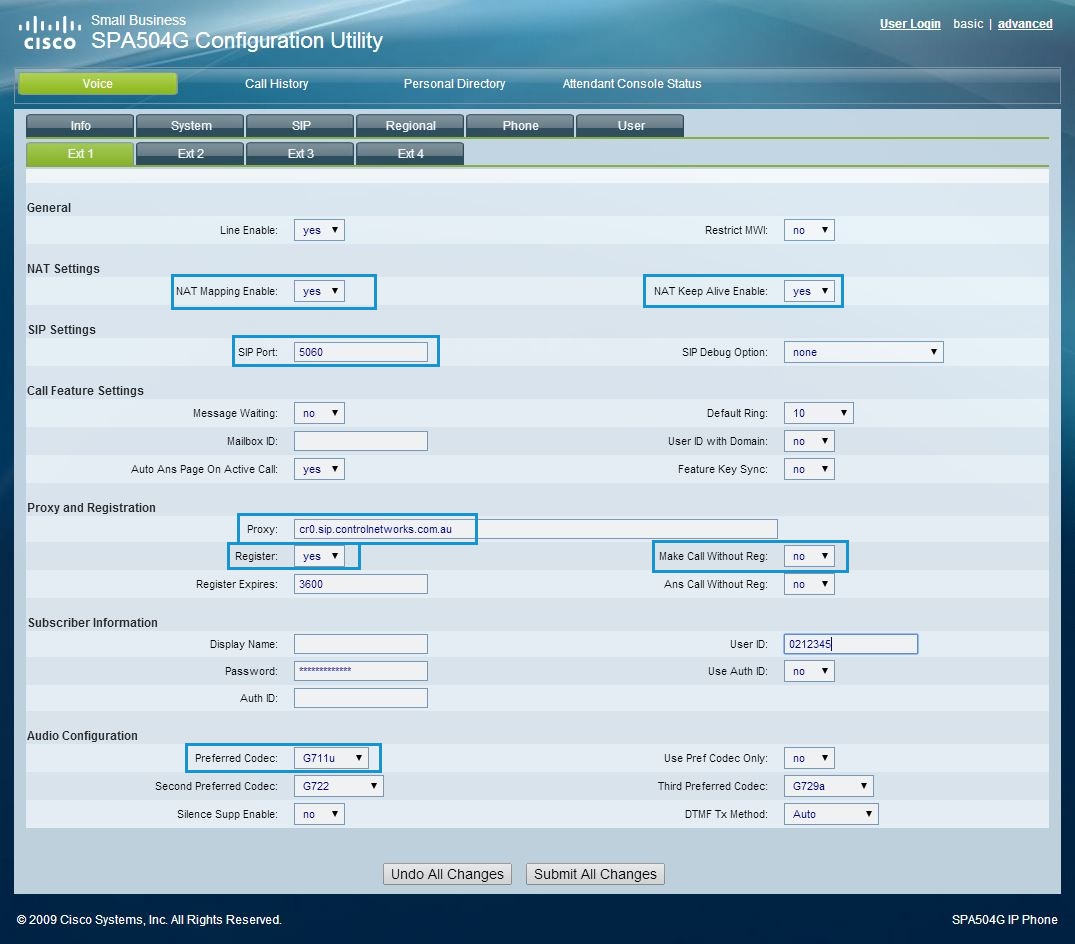 .
.
It is important to note that phones vary widely in their setup methods and interfaces. While this guide is centred on Cisco/Linksys phones, you will be able to find comparable options in your phone.
Accessing the setup interface
In order to register your phone with us, you need to set up your phone with our sever and authentication details.
On most phones, the easiest way to do this is via the web interface. Open the menu on your phone, navigate to 'Network', find 'IP Address' (it should look something like 192.168.0.111 or 10.0.0.1).
On your computer, open your web browser and navigate to this IP address. NB: Your computer must be on the same network as your phone for this to work.
Once the interface has loaded, enter the configuration mode. On Cisco/Linksys phones, click 'Admin login' on the top right. The important fields are highlighted on the image below.
If your phone's interface is different, try to find something similar to the fields highlighted above.
If your phone does not support a web interface, you will have to do it from your phone's menu.
Authorisation settings
NAT settings:
NAT Mapping - Yes
NAT Keep Alive - Yes
SIP Port - 5060
Registration:
Proxy / Server - cr0.sip.controlnetworks.com.au
Register - yes
Make/Answer Calls Without Reg. - No
Authorisation:
User ID / Username: The login number of your extension (eg. 0212345)
Password: The password we've supplied for your extension
Use Auth ID - NO
Your username and password for the extension will have been sent to you in an email. If you don't have this email, or are looking it up at a later date, you can find it in Control Networks VoIP Commander (VoIP.controlnetworks.com.au) by editing the desired device code on the Devices tab.
Alternatively, or if you haven't requested management access, please contact support on 03 9387 1666, option 2, or create a new support ticket.
Other settings
You may be able to configure various other settings, depending on your phone model.
Display name- This is what gets passed through to other extensions when you call them.
Station name- The name that shows on your phone's screen.
Line key name- Change the label for each line button. On Ciscos, this is under the phone tab.
Important Note
These are the settings required to set up connection to the server and enable you to make calls. There are still plenty of customisation options available, including time zones, speed dial, etc. and can be found in various locations in the menus.
Control Networks ships any phones purchased from us fully configured, complete with your username/password. Please contact sales to find out more.
